GKE 환경에서 istio 세팅
준비
- GKE
- SSL (Let’s encrypt)
- Domain(Freedom.com)
- istio 기본지식(조직에서 분산형 MS 기반 앱을 어디서나 실행할 수 있도록 지원하는 오픈소스 서비스 메시)
- cert-manager 사용
[순서]
Architecture

출처 : https://cloud.google.com/architecture/exposing-service-mesh-apps-through-gke-ingress?hl=ko
DNS 세팅
DNS 발급
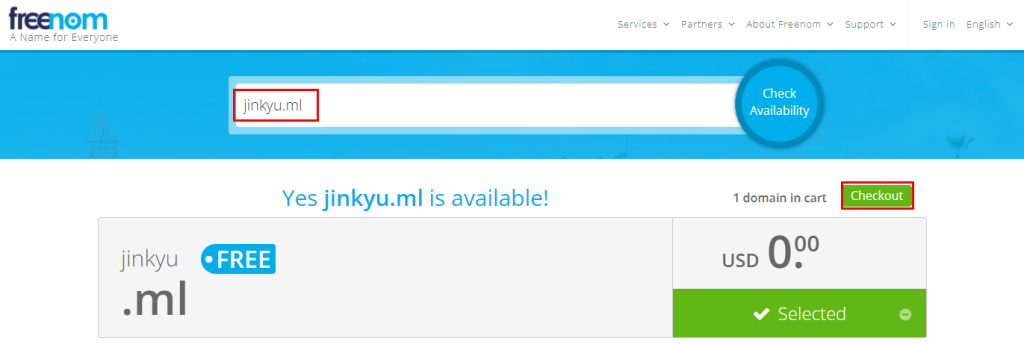
- freenom 도메인 발급
도메인 검색 후 가능한 도메인을 풀 네임으로 검색 후 Checkout
후에 가입 및 절차를 거치면 Domain 발급.

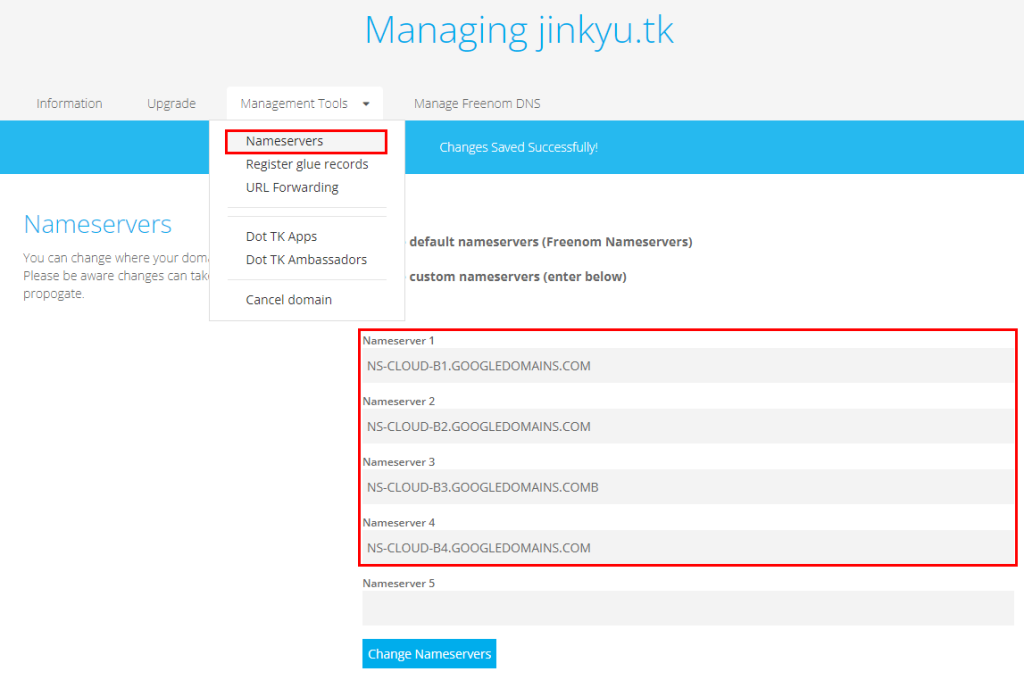
- Cloud DNS에서 생성된 Nameserver를 freenom 사이트에 적용
(google Domain 및 타 Domain은 각 사이트에 접속 후 적용)
Cloud DNS 세팅
istio 및 cert-manager 세팅
- istio 설치 (링크)
- Download Istio
curl -L https://istio.io/downloadIstio | sh - # down
cd istio-1.11.3 # Directory 이동
export PATH=$PWD/bin:$PATH # istioctl Client를 path에 추가
- Install Istio
istioctl install --set profile=demo -y # istio install

kubectl label namespace default istio-injection=enabled # 추후 애플리케이션 배포 시 Envoy 사이드카 Proxy를 자동으로 삽입하도록 Istio에 지시하는 Namespace Label을 추가.
- Install cert-manager
kubectl apply -f https://github.com/jetstack/cert-manager/releases/download/v1.1.0/cert-manager.yaml # github에 있는 cert-manager.yaml 배포
- ClusterIssuer 배포
# 모든 Namespace에서 적용되는 ClusterIssuer 배포(prod/staging)

kubectl apply -f - <<EOF

#prod

apiVersion: cert-manager.io/v1

kind: ClusterIssuer

metadata:

  name: letsencrypt-prod-istio

spec:

  acme:

    server: https://acme-v02.api.letsencrypt.org/directory

    email: jinkyug@cloocus.com

    privateKeySecretRef:

      name: letsencrypt-prod-istio

    solvers:

    - http01:

        ingress:

          class: istio

---

#staging

apiVersion: cert-manager.io/v1

kind: ClusterIssuer

metadata:

  name: letsencrypt-staging-istio

spec:

  acme:

    server: https://acme-staging-v02.api.letsencrypt.org/directory

    email: jinkyu@cloocus.com

    privateKeySecretRef:

      name: letsencrypt-staging-istio

    solvers:

    - http01:

        ingress:

          class: istio

EOF
- 배포 확인
#Pod, Service 확인
kubectl get svc,pod -n cert-manager

#secret 확인
kubectl get secret -n cert-manager

#ClusterIssuer 확인
kubectl get clusterissuers.cert-manager.io
- test Application 배포
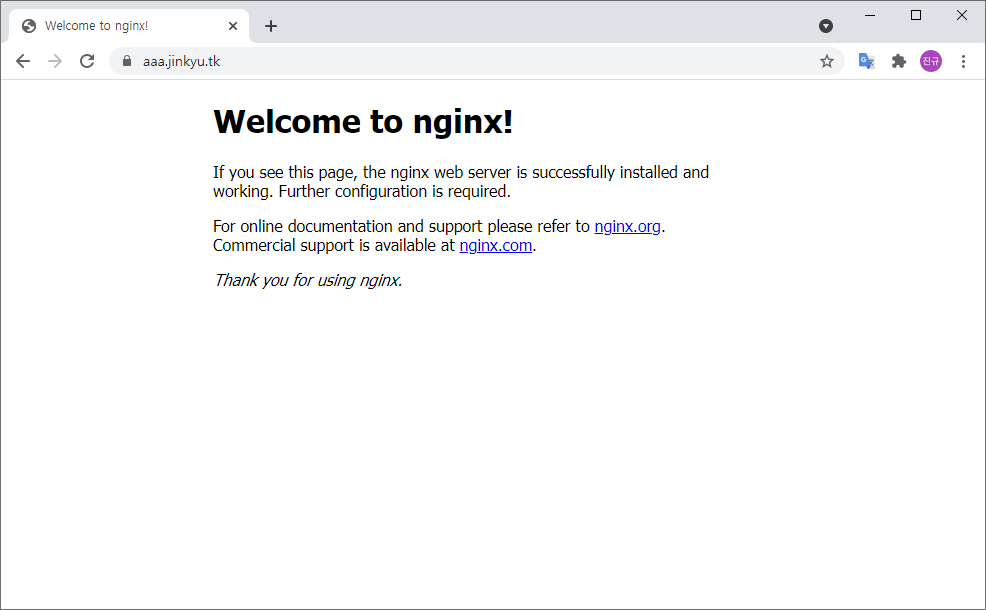
#nginx Image 배포 (port 80 open)
kubectl create deployment --image nginx --port 80 nginx

kubectl expose deployment nginx --port 80
- 인증서 발급
#nginx Image 배포 (port 80 open)

---yaml---

apiVersion: cert-manager.io/v1alpha2
kind: Certificate
metadata:
  name: nginx
  namespace: istio-system # istio 설치경로
spec:
  secretName: nginx-tls
  issuerRef:
    name: letsencrypt-prod-istio
    kind: ClusterIssuer
  commonName: test.jinkyu.tk # 알맞는 도메인으로 변경
  dnsNames:
  - test.jinkyu.tk # 알맞는 도메인으로 변경


----CMD-----

kubectl get certificate -n istio-system # 생성된 certi 확인.
- Istio Gateway 배포
#Istio Gateway 배포 (port 443 redirection Setting)

---yaml---

kind: Gateway
apiVersion: networking.istio.io/v1alpha3
metadata:
  name: nginx
spec:
  servers:
    - hosts:
        - test.jinkyu.tk
      port:
        name: http
        number: 80
        protocol: HTTP
      tls:
        httpsRedirect: true # 80포트 진입 시 443 Redirect 설정
    - hosts:
        - test.jinkyu.tk
      port:
        name: https
        number: 443
        protocol: HTTPS
      tls:
        credentialName: nginx-tls  # Secret 명
        mode: SIMPLE    # 기본적인
  selector:
    app: istio-ingressgateway # Selector 설정
- virtualservice 수정 후 저장
#virtualservice clusterip에 붙을 때

	---yaml---
	kind: VirtualService
	apiVersion: networking.istio.io/v1alpha3
	metadata:
	  name: nginx
	spec:
	  hosts:
	  - test.jinkyu.tk  #적용 도메인
	  http:
	  - match:
		 - uri:
			 prefix: /   #경로 수정 필요
		route:
		  - destination:
			  port:
				number: 8080    #Service name 및 Port 수정 필요
			  host: hello-cloudbuild
	  gateways:
	- nginx # gateway name
- Download Istio
완료
